Showing posts with label upcycling. Show all posts

Thursday, April 24, 2014

Mix & Match Bathing Suits and a Beach Coverup

So I should have included this tidbit at the end of yesterday's post, but it was beginning to feel a bit long ;) so I decided to hang on and save this part for today. That means that I was inspired to add a little something extra to beef up today's post...more on that later!

Now that I have completed the 'fixes' on my two bathing suits, why not take a look at how I can wear them? As matching sets...
Matchy-matchy: love all three!

or mixing sets! I think my favorite of the mixing sets is this one in the middle...the strapless top actually covers the top of the high-waisted bottoms and looks like a one-piece :o) Love the different looks I can achieve with what started as two separate suits!
Mixy-mixy: love 2 & 3 best :)

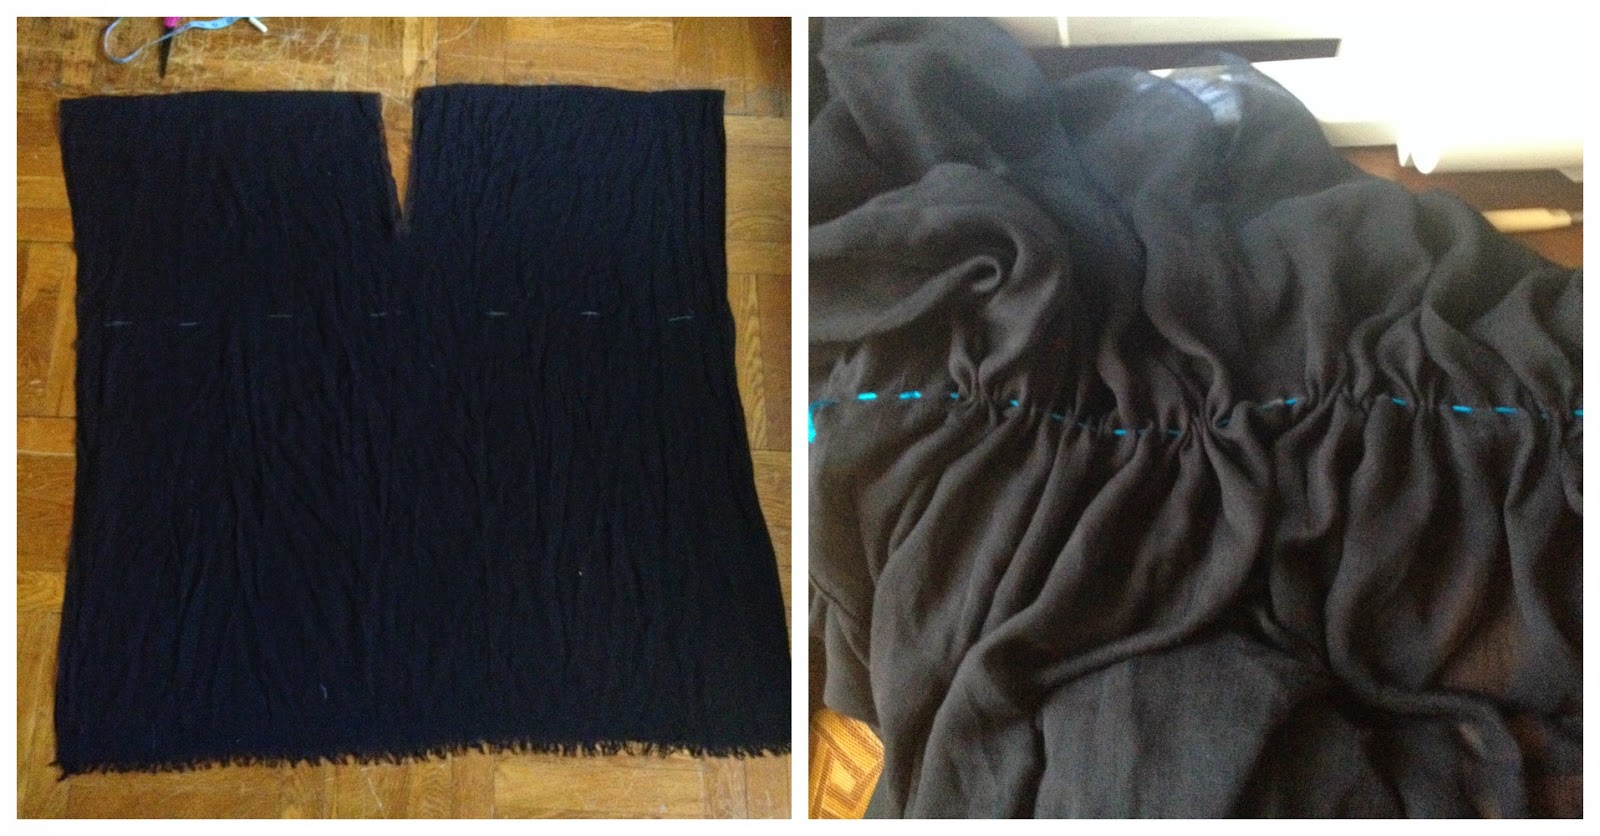
And how shall I complete my beachy/poolside look, you ask? Well, whether you do or not, I'll show ya! Here's what I started out with:


  • a thin gauzy scarf...depending on the width you could use two, but mine was super wide so I only needed the one (thrifted, of course)
  • elastic (I chose matching)
  • matching thread
  • scissors


Because I had an extra wide scarf, I laid it out folded end to end. The fringy ends become the bottom of my coverup. I folded this in half sideways and cut along the fold down about 10-12 inches. This becomes the neck hole. If you have two thinner scarves, you'd simply sew them together front and back leaving a large enough opening for your head at the top where I've cut mine. Example here. Her's is finished differently than mine (and I'm kind of wishing I'd done what she did...). Oh well! Great excuse for trying out her version ;).

I next determined where the elastic needed to be placed by putting it on, measuring how far down from the v I wanted my waistline, then added that to the length of the cut to get my total distance from the top edge. I marked my line with chalk on both sides, then used embroidery floss to gather the front and back. Next, I sewed the elastic in place with a zigzag stitch and pulled the floss out.

Here's how it came out. The sleeves ended up being very long, so I've simply folded up the ends onto my shoulders for the pics and may tack them in place later...still deciding. It can also be worn as a 'skirt' coverup by taking off the top half and tying the sleeves together in the front as a bow.

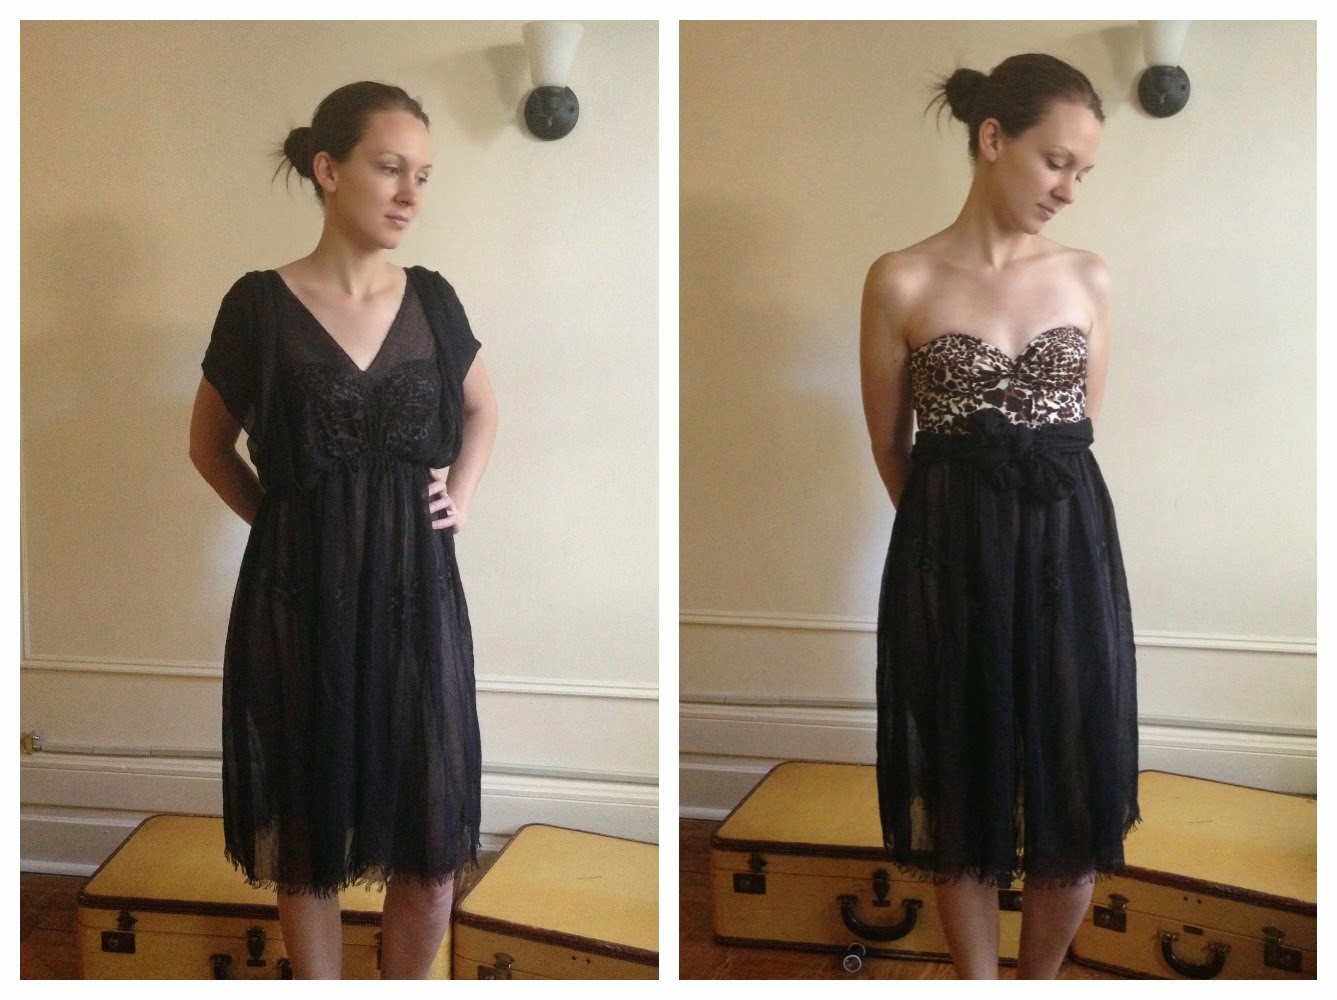
This is my favorite look with the new coverup and a peek at my 'one-piece' option with the coverup I made in January.
Mixing it up with my animal print and palm/leaf print coverup, what! 
Coverups can be a great intro to refashioning as there are some that are no-sew, and some that require minimal sewing/cutting/sizing. I, personally, love a quick project now and then and this one fit the bill today :) Here's the final before and after shot!

Happy Refashioning...
Peace,
Andrea

Wednesday, April 16, 2014

Reversible Mini

Finally! I made this refashion over the weekend and now I'm getting to post about it :) We had unbelievably lovely weather up until Monday, so apart from throwing this together, all of my time had been spent out doing stuff. Then, Tuesday, it rained....ALL day. Then it started turning cold and overnight, it snowed :(. The least I can say for our weather today is that it is sunny. It is also windy, cold, and I had to wear winter gear all over again, but it's sunny. Which means I have enough light to take pictures!!! Hence, the posting of this refashion...

How about getting down to it? I found these three pieces at my local thrift store not long ago and paid $9 total.


I started to get an idea of what I'd want to do with these two tops as I was trying them on at the shop, though I had also considered just taking them in so that they fit better. The pajama pants I grabbed for the use of the pale gray fabric for another project. Once I got home, I set about my work. I'm making a skirt...but not just any skirt! It'll be reversible :) I laid out my floral top inside out, laid another jersey knit skirt on top and cut out around the edges. I then sewed up the sides and zigzagged the edges before turning it right side out.

I followed the same steps for the next top as well.

This is where the pajama pants come into play. Seeing as I really only bought them planning to use the legs, I went ahead and cut off the waistband to use here. I first sewed it to the top of one skirt using a zigzag stitch to allow stretch, wrong sides together, then did the same with the other skirt on the other side of the waistband. It looks like one long tube until you fold one skirt to the outside. There! Floral on one side, and gray and white abstract print on the other!
The gray patterned waistband is showing a bit of the floral and I'm still working out how I want to address that.

Here's the floral side: nice and casual and oh so comfortable! But also really cute and versatile, as it could be easily dressed up.

Now, the gray patterned side! Again, casual and cute, but I can see this with black heels and a bit of leather on a date night ;).

The hems line up so that if I tug the outer one down a tad it stays in place without riding up and showing the under layer at all. The fabrics aren't slippery, so they catch enough to make this super easy to wear either way. I can also see playing with patterns as I style this skirt when warm weather returns. I've got the perfect navy and white striped top to wear with the floral side, and I'd love to try a bold print with the gray side. I need to go play in my closet for a bit to get some ideas :).

Here's one final look at the before and after!

Peace,
Andrea

Tuesday, April 1, 2014

Fool's Gold

I've been wanting a pair of cute oxfords or saddle shoes for a while now. It's a look I'm a fan of because I like the bit of masculinity they can lend to an outfit. And there are so many possibilities with colors, prints, metallics, fabrics, etc.

Originally $88 on the G.H. Bass website, these Enfield Saddle Cognac shoes are now on sale for $59.99. I paid $4 at the thrift store for a brand new pair.

I wanted to change these up, because in my opinion, they were pretty ugly. The suede fronts and sides immediately made me think of either paint or fabric as a means of making these more 'me'. I opted for paint, and metallic, at that! I grabbed both gold and silver acrylic craft paint and a small stiff bristled straight edge paint brush. I tested a small area to see how the paint would go on, then painted the entire side.

I'd thought to go the route of mixing metallics, so I painted the front of the shoe silver...but the gold was too yellow and the silver too gray! They just weren't working out the way I'd envisioned. So, I mixed my silver and gold together (more gold than silver...about a 4:1 ratio) to get the perfect shade. The picture on the right shows the paler shade of gold on the top shoe while the bottom shoe has the much yellower gold.

I had to paint over the silver and gold I'd already painted, so in total, each shoe got 3 coats so as to have the same finish and to cover the 'wrong' colors completely. Much better!!!

Now I've got a still neutral pair of shoes that will go with lots of different outfits. I couldn't wait for them to dry the full 24 hours before trying them on to see how they'd look. So pleased with the outcome and excited to style these this spring :). Once I've let the paint dry a full day, I'll seal them with mod podge and allow them to dry another full day.

Love that I saw potential in these not-so-cute shoes and now have a pair that I absolutely love! It took me a few months to get up the courage to dive into this one, but they are well worth the wait...and the $4 ;).

What do you think? Have you ever refashioned a pair of shoes? This is not my first shoe refashion, and certainly will not be my last!

And just because it was so nice today...an outdoor OOTD pic!
Scarf and leggings: Target, old  Jacket: Express, old  Chambray shirt: thrifted  Converse: Marshall's, old  Coach wristlet: gift
On an April Fool's note, my son has been playing 'tricks' on me all afternoon...mostly hiding things from me that I need ;). Love that they're still such innocent tricks!

Peace,
Andrea

Monday, March 31, 2014

Black Silk Tent: Refashion #3

Happy Monday! Mine started out poorly so I'm working on turning that around...and finishing up a refashion definitely helped my mood :).

Let's take a look at how I decided to use this last leg from the black silk tent pants. First off, it's going to be a top. I could have made a skirt with a gathered elastic waist, but I wanted something that I'd be sure to wear often. So, I started by unpicking the leg's inseam by about 4 inches. This will be my neckline.

Then, I trimmed up the straps a bit, and tried on my 'top', pinned in the sides and took them in creating an a-line shape. The scrap of fabric in the first shot is just to show the angle at which I stitched down each side. You'll notice that the seams are actually more towards the back, and that is to flow better with the sides which will become the armholes. I trimmed off the excess, and zigzagged the raw edges to finish.

Then, I finished off the raw edges of the straps and back by repeating the same process that I used on the other top for a baby/rolled hem. Worked like a charm :). The leg hem was still intact, no work there. I pinned the straps in the back, determining where they'd best cover my bra straps, and then sewed them in place. Next, I folded the neckline under to see if the V would work.

I finished off the neckline by folded the edges under and topstitching in place. Now, I've got an easy V-neck tank top (that looks much better tucked in the front).

But, I still had that original waistband left over. I quickly stitched the bottom of it shut again, and then buttoned it around my waist, and now the top is much less casual and definitely more figure flattering. Love it!

I'm definitely a fan of black, and the good thing is that I've got plenty of colorful skirts, shorts and pants to mix and match with these last two tops. Can't wait to be able to wear them! At least the rain has stopped and the sun is shining brightly today.

Here's a look at the before and after:

And, a quick review of the before, after, after & after!

Can't beat three pieces for $4, can you? Well, maybe you can, but I'd say I did pretty well ;). Hope you are enjoying good weather and good health...gotta get back to my spring cleaning (looks like our apartment exploded, but its all for the good as we purge and organize). Happy Refashioning!

Peace,
Andrea

Friday, March 28, 2014

Black Silk Tent: Refashion #2

Talk about the pair of pants that just keep giving! This is the second of three refashions that I've made from this pair of black silk 'pants'. Number three is in the works and will be posted another day, but let's focus on the middle child, shall we? 

So, quick refresher, I found this pair of silk pants for $4 at the thrift store and snatched them up. I then made them into a pair of pretty shorts. But what happened with all of that extra fabric after I cut out my pattern pieces for the shorts? Well, notice on the right, I've laid them out on the floor along with a tank top I'd initially planned to copy. I definitely have enough for two refashions...one from each leg! The scoop was the crotch, the notches on the sides are where I cut out the shorts crotch and the bottom is the remainder of the leg (which means its a loop of fabric). 

I decided right away that the shape lent itself to making an easy top. So, I grabbed one of the legs, pinned the 'straps' over onto the backside of the 'leg' gathering one of the straps and leaving the other wide. I wanted to get an idea of what I'd prefer.

Not bad from the front...a bit loose, but definite potential! The back made me realize immediately that I'd go with the gathered strap. What you can't see in this picture is that under my arms are huge gaping openings because I pinned the straps more towards the center back seam. I'll be adjusting that.

I gathered each strap, pinned them, then folded the top in half to make sure that each 'notch' was equal...a little overlap was fixed by a quick snip. Then, I repinned the straps, but this time I did so making the arm openings much smaller and leaving more space between them in the back.

Ok, definitely better from the front...from the side, not bad either...but the back is a little too scandalous for me ;).

So, I pinned the back to see how that would help...I'm liking how its still low, but not too revealing.

Up to this point, all I've been doing is pinning, trying it on, adjusting, pinning, trying on again, etc. Now I need to start sewing. My first step was to finish off the raw edges of the outer 'strap' and all along the new back over to the other strap. I wanted to challenge myself with learning how to do a nice baby/rolled hem without needing a special sewing machine foot for the job (cause I don't have one). So, I googled it and came across this tutorial that showed me how! There are actually many ways of doing this and various tutorials (super helpful), so I could have tried many of them and gotten similar results. This is just the first one I came across. First step was to straight stitch all along the edge of the fabric about 3/8 of an inch in. Next, you fold that over along the stitching and sew as close to the edge as you can. Trim away the excess as closely to the stitching as possible, and then fold over one more time (tiny fold) and stitch as close to the edge as you can. Here's how mine turned out sans pressing. It actually is beautiful how even my hems are and how tiny, though without pressing them its hard to tell ;).

Next, I sewed along where I'd pinned the back in (my measuring tape shows the line as you can't see the stitching). Then, I zigzagged the ends of the straps, folded them over and straight stitched across.

I finished off the raw edges of the new back seam with a zigzag stitch and the neckline with a double straight stitch (just ran it through my machine once, close to the edge, and again 3/8 from the edge) since it's edge was already finished and folded. Remember, the neckline is the previous crotch...or maybe we should forget that! Haha, oh well, I'm not worried cause it's been laundered and the crotch showed no wear at all (being as it was so low hanging in the original garment).

Next, I sewed the straps in place. I had marked where they'd be attached, and a simple straight stitch does the job.

My final step was to repeat the process for a rolled hem on the bottom of my top. That edge was much easier to finish off as it wasn't quite as curvy as the straps. And here's the final product! I love that its nice and simple in the front and a little bit sexy in the back. I want to start creating different bandeau tops to wear under this from my scraps :). Now, into the pile to be ironed! And hopefully out soon to be worn...if our weather would move past cold and now, rain. But at least its not snow!

I'm really pleased that I went with the initial shape of the piece of leg instead of cutting and trimming to get a specific shape. The process felt very organic and that's cool when the remnant determines its own outcome, so to speak. I'm excited now to see how the other leg will turn out!

Here's a final look at the before and after:

Hope you enjoyed this one!
Peace,
Andrea

Wednesday, March 26, 2014

The Giveaway Scarf

Yay! I finally finished the giveaway scarf for Lauren :). She initially said that she loved the combination of the mustard yellow scarf with a braided scarf over top. When I asked what type of color combo she'd like, she asked for gray and mustard...but I had a hard time finding mustard! So, upon asking for other colors to go with the gray, she said Tiffany blue or greens. Well, that's more like it! I had the perfect Tiffany blue knit fabric that I'd thrifted 3 years back (I found a huge length at a large thrift store where textile companies donated fabrics and unfinished/damaged new garments).

So, I got started! I had this pair of leggings that I'd found (tagged/brand new) at the thrift store but they were too big and instead of taking them in I figured I'd hold out for the perfect project to remake them. Unfortunately I got excited and took them apart before taking a picture, but leggings are leggings. The only thing 'special' about these is that they had a stretchy lace waistband that I'll be able to use later on :). So, I deconstructed them and opened up each leg along the inner seam.

Now, I wanted to recreate the same shape and drape of the mustard scarf. It used to be a tank top with a drapey front (I basically cut off the top and rounded the drapey part). Laying the legs out I started to work out how I could make this work. I folded the end of the legs over by about 6 inches and cut along the fold.

I flipped the cut bottom portion of the legs so that the angles mirrored the angles of the top portions. I've folded over the edges to meet the smaller pieces here to show where the seams will be.

I just used a straight stitch to sew up each seam, trimmed the raw edges so that they were even and then turned it right side out.

Next I needed to get the shape cut out. I folded the scarf in half and cut a curve leaving as little scrap as possible.

This is what's left! Most of it usable and therefore heading to my stash :). And all I need to do to wear this is to fold the top inward and draping does the rest. No need to finish off raw edges; a good basic lightweight scarf.

Now, to make the braid, I cut the blue knit fabric into long strips and braided them into a plait long enough to wrap around twice. I sewed the ends together and wrapped with more 'yarn' to finish off. The two are separate from one another so that Lauren can adjust and wear them as she wants. Here's how the final product looks!

Anyone else wondering what happened to the other leg (since it only took one to make this scarf)? Well, now I have my own gray scarf to use as a base for all of my different braided scarves :). So, thank you Lauren for liking the scarf you did which prompted me to recreate it and afforded me my own version of your scarf! Oh, and to complete this post, a couple of 'outtakes' so to speak...my husband was talking to me as I got these shots and I just had to share how I look mid-word and mid-blink ;). Enjoy!

Peace,
Andrea

Tuesday, March 25, 2014

Black Silk Tent

Seriously, yes, a tent...these pants could've been dismantled to make a tent...or a parachute! ;) But when you see this much silk for $4 then, you gotta go for it.

Now if I were more adventurous, I might have kept these as they were and just wore them because they give the functionality of pants and the look of a skirt. Win, win, right?! Instead, I decided to take these apart and just before starting I decided on what I'd want to make...

First up, I took the waistband off and separated the legs from each other. One leg could totally be a dress all on its own!

Now, one of the things I liked about the original piece was the high waisted fit but all of that pleating was just too much, which is why I unpicked the pleats. It did leave a lot of lines, but I feel that they end up blending in.

I took some freezer paper and traced out the inseam and crotch of one of the legs and then cut out the 'pattern' piece. I had already measured the desired rise (from waistline to crotch plus a bit for seam allowance) and my desired waist measurement (several inches bigger than my own in order to allow for some gathering at the waist). I laid it on the individual legs lining up the outer edges so that I could maintain the pockets and that makes less work when putting these back together :). I ended up cutting the length of each piece to be a few inches shorter than my pattern piece.

So, yeah, I'm making shorts (hopefully you've figured that out by now, lol). I sewed up the inner leg seam by using a french seam...nice and neat for straight edges. Then, I sewed the two new legs together using a straight stitch and finished off the raw edges with a zig zag stitch. I gathered the waist by measuring out a piece of elastic a couple of inches shorter than my waist measurement and stretched it as I zigzagged it onto the waist. Next, I thought to reattach the existing waistband, but it didn't end up being as substantial as I wanted. So, I cut off the hem of one of the original legs and used it to make a casing to cover up the elastic and raw edges.

Next step I had to decide what to do about the waist. I wanted it to be thick, so I got to looking through my stash for just the right piece...pieces. I came across this black sash and a length of lace that I had thought to sew onto the sash to wear as a belt. Perfect for this project :). First, I sewed the sash onto the waistband. Sorry for pic quality here, this project took me way longer to complete than I'd expected and daylight didn't last.

Next, I sewed on the lace along the top flat edge of it. I finished off the back by adding snap buttons and folding the edges over and sewing in place. Now, I didn't sew the black sash all the way around. I left around an inch and a half open in the back to allow for a bit of stretch so that I could put these shorts on, while not leaving too much slack causing gaping when they are buttoned up. For the moment, I've finished off the bottom hem by cutting across them with my pinking shears...that will probably change but I hadn't decided how I wanted to do the hem.

Here's the new waistband!

And here are the shorts! I'll be able to dress them up and down and I'm loving the flowy light feel. And they have pockets :). 'Nough said.

 Here's one last look at the before and after:

The only thing left to do is decide what to do with all of the leftover silk! No worries, I'm pretty sure I'll be turning that into a top :). Hope you like this one. I sure do :).

Peace,
Andrea