Showing posts with label quick-fix. Show all posts

Thursday, June 11, 2015

// #thriftstylethursday // to the max

So happy to be posting for Thrift Style Thursday, even if it is a bit later in the day. Today's theme is brought to us by Megan of Traverse. I had a few maxi options in the form of skirts or dresses, but thought this should be the one I tackle. I picked it up last summer at a yardsale for $1. Really nice quality jersey, bold stripe....with the bottom chopped off! The previous owner was several inches shorter than me ;). No big deal though, this is one of my quickest fixes yet! 

All I did was tie a knot in the bottom to raise up the length of the front. That's it. For now, that's good enough. Later on I may shorten the length a little, give it a hi-low hem, or something....oh, I know! Rounded hem that curves up at each side. Bam!


Threw on a thrifted belt, some old sandals, and I'm ready for a kindergarten picnic at the park :-D


Awkward length. Sorted. Now about those bold stripes....hahaha, may have to get used to this one!

Now go see what the other Thrift Style Thursday ladies have put together for this week...I'm sure they won't disappoint!


Friday, February 27, 2015

Quick 'Fix' Friday: No-Sew Floral

As I'm forcing myself to do a major purge of my stash (being very strict about what I keep and what I pass on) I decided to spend my morning playing dress-up with some of the pieces to help me decide. I pulled out this oversized floral dress I picked up while in Michigan last summer. My sister and I always take the time to plan a thrifting trip early on a Saturday so that we can have breakfast and go shopping kid-free. Rare chance for both of us! I absolutely loved the floral print on this dress and knew that I'd be able to do something with it.


Little did I know that I wouldn't have to sew a stitch to completely love the after! I started by unbuttoning the top two buttons and folding the collar inward. Then I put on a thrifted gold belt and called it quits!


I'm loving the bohemian feel to it. It's light and airy and lovely to twirl in :). So romantic! Hoping I can wear it on a date with my husband come warm weather.


Well, it's definitely a keeper, that's for sure! I have quite a pile ready for donation, and more to go through, so I'll update as I go. But if you're looking for a 'fix' for an oversized dress, sometimes a belt is as far as you need to look.


Make sure you pop over to visit Agy of Green Issues by Agy to see her Fix It Friday post! She's sharing tips on sewing zippers...one of my sewing nemeses ;). Happy Friday, all, and happy refashioning!

Peace,
Andrea

Friday, February 20, 2015

Quick 'Fix' Friday: Ink Spots


So I nabbed this mint cropped sweater at the thrift store for $1.33. Only problem? Ink spots on one sleeve. Not too much of a problem though!


I rolled the sleeve up twice, just enough to cover the stains, then did the same on the other sleeve.


I grabbed some matching thread, scissors and a needle, and tacked down the cuffs on the seam and then on the opposite side of the sleeve.


Easy fix that took me all of 5 minutes! They reach just about 3/4 length and now I've got the perfect kind of layering sweater to transition into spring.


I put it on over a loose silk blouse, then over a dress to give you an idea of how I'd wear this (since showing my midriff isn't an option ;). Because of the loose fit of the sweater, it would also balance out well over a more fitted silhouette. Now, if you've got the stains on the ends of any sleeves, you can also hem them under after cutting off the offending portions, or if it's just a jersey knit you can cut and let the edges curl over on themselves! Talk about another easy option ;). If you've got the skills, the permanent fix for something like this could be to undo the knit past the point of the stains and reknit new sleeve hems...which may be a part two to this quick mend.

Hope your Friday is a happy one!
Peace,
Andrea

Friday, January 30, 2015

Quick 'Fix' Friday: Mending

Today I've just got a quick mending project that I took on for a friend. I've not been feeling well and I just don't want to do much :-/. But this was easy. She had this cashmere sweater with three small holes near the tag and collar.


I picked out a matching thread, threaded my needle, and as the picture shows I sewed in a circle around the hole weaving through the knit.


Pull the thread taut and tie off, and voila!


Once mended, there is only a slight bit of pulling visible on the outside, and as there's a collar on this sweater, it won't show at all. Easy peasy and takes 5 minutes!


Hope this little mending job helps you out with all of those holey knits that crop up in winter time! Mend them up and if the spot shows too much you can always camouflage it with something like this or this! Oh, and don't forget to check out Agy's (Green Issues by Agy) post on darning socks!

Peace,
Andrea

Friday, January 23, 2015

Quick 'Fix' Friday // DIY bootie heels


I found this pair of booties sometime last year, and wore them a handful of times. The problem with them was that the sole of the heels had completely come off and I was walking on the plastic core of the heel...loud, for one (sounded like I was always stomping around when wearing them), and not good for my feet (the heels were meant to be at a certain height and the difference was hurting my feet).


So, I decided I'd find a way to re-heel my boots all by myself. I'd taken boots to a local shoe repair shop before and walked away with unmended boots for the simple fact that he was charging more than I could afford. So, though replacing only the heel of these booties would have cost less, I still wanted to give DIY a go.


I gathered my supplies: rubber shoe soles I bought online, scissors to cut the soles down to size, shoe goo for repairing (and waterproofing), and some leather scraps.

As you can see, I'd already completed the project without taking pics of the step-by-step...but you can imagine what it looked like, right? ;)

I started by cutting the soles down to size. Now, if I'd found a pair the right size, then this step is moot, but I didn't on the first round of searching (I'm lazy and didn't want to search for too long). I traced the shape of the heel onto the sole, cut them out, then did a bit of trimming to get them just right. Now, because I used scissors, I didn't have a completely clean edge. Would have preferred something that'd leave me a clean looking sole, but oh well.


Next, I put shoe goo on the exposed heel and the sole, then pressed them together. I allowed them to cure for the full 72 recommended hours before taking on the finishing step of covering the seam with strips of leather. Once they'd cured, I cut the strips to equal widths and using shoe goo, adhered them to the heel/sole seam to cover it. The seam wasn't completely clean (as I'm not a professional and the heel was worn a tiny bit more in the back), so the strips helped to give the boots a finished look and a tiny added detail. Again, I let them cure/dry for a couple more days and voila!


I've got enough of the rubber soles left to repair another pair if need be. And figuring cost of materials...it was about $3 taking into account the amount of each item left over for future projects.


Time on this one isn't that bad. Yes, you have to allow the adhesive to cure for a few days, but the amount of time you actually spend working on this project is well within a half hour! Not bad at all, if I do say so myself.


These thrifted beauties went from practically unwearable, to my most wearable pair yet! Hope you found this repair inspiring, and that it pushes you to try out your own DIY mending/repairing project that's been sitting there for ages. Any questions, comments...feel free to drop me a line! And don't forget to check out Agy's Fix It Friday post here.

Peace,
Andrea


Friday, January 16, 2015

Quick 'Fix' Friday: Tank Top Take-In

All this alliteration! Way too early for that ;) So starting this week, I'm linking up with Agy of Green Issues by Agy on our Friday posts. She is hosting a series called Fix It Friday, and I'm going with Quick 'Fix' Friday. My posts will mostly center around quick 'fix' refashions that are simple and quick.

Today's features this most awesome of all tank tops I ordered from Michigan Awesome in late summer on sale. Knowing it would fit tight on my stomach if I got a small size, I went with the medium expecting this to happen...


This is something I'm used to, so no big deal, right? Let's get to fixing the problem. Now, to start, I will sometimes take it in starting with the length of the straps. This helps if it hangs too low and too big on top, but this time, I didn't have to do that.


I pinched in each side at the armpit and marked where I needed to start. I then pinched down at my waist where I would taper out to meet up with the side seam.


I sewed down each side between my two points, trimmed my excess, zigzagged the raw edge and then using a slanting zigzag stitch I sewed along the inside of the straight stitching. This creates a smooth seam that doesn't pull.


And that is that! It took all of 10 minutes to get it just right (I did have to adjust a tiny bit where I tapered out). This may not seem the timeliest of refashions, but I've been wanting to represent for my home state and I can totally wear a big cozy cardigan over top or just throw this on to work out...until warm weather returns.


Remember to check out Agy's post which shows how to fix snags! And follow along each Friday for more quick refashions and mending tips :)

Peace,
Andrea

Friday, January 9, 2015

Giveaway Winner and A Collaboration

Time to announce the giveaway winner for last Friday's Blogiversary post. Thank you to everyone who entered, commented, and simply encouraged me on my way! I wrote each name on a piece of paper, put them in a hat, then drew one out!

And the winner is...


I'll be contacting you shortly and a post will follow showing the whole package of little goodies she'll be receiving :) Congratulations!

Also, I've planned to keep up with my Friday Quick 'Fix' posts more regularly and to keep me accountable I've paired up with Agy of Green Issues by Agy who has a regular Friday Fix It feature that I follow. Starting next Friday we'll link up to each other's posts to share mending tips for regular wardrobe fixes, as well as quick refashions on my part. Take a look at Agy's post from today!


Excited for this new partnership, and hope you discover some helpful and creative mending tips along with us :)

Until later, happy refashioning!
Peace,
Andrea

Friday, November 7, 2014

Quick 'Fix' Friday: Cleaning Thrifted Shoes

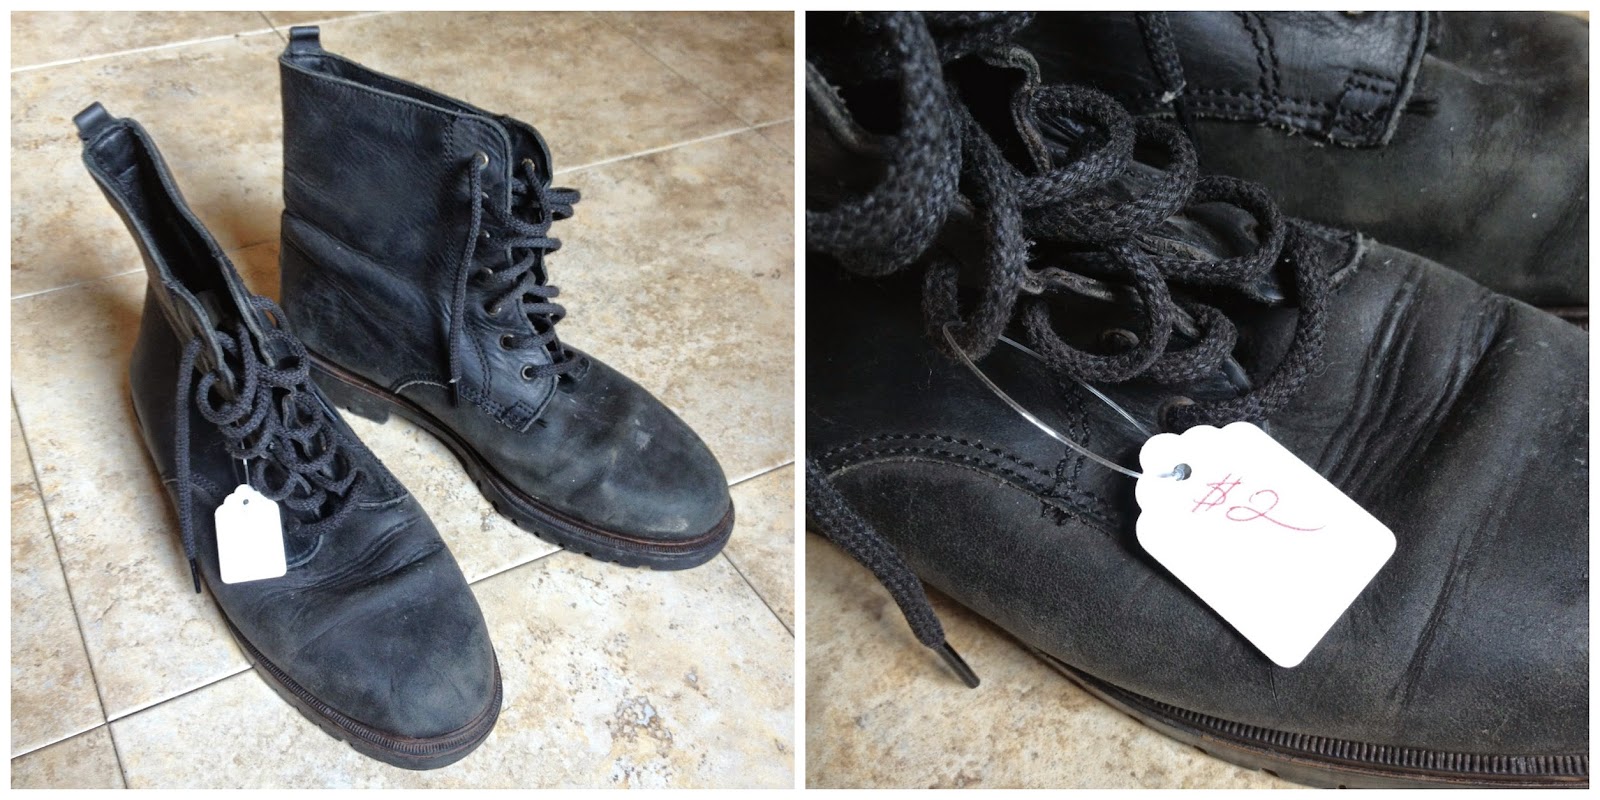
I LOVE THRIFTING!!! I am also notorious for stating the obvious;). Thrifting is like a great treasure hunt that requires time, effort, and a love of sifting through every.single.item. in order to find the gems. That's right up my alley! I guess the not-so-glamorous side of thrifting is cleaning and disinfecting the items you decide to bring home...yes, I called thrifting glamorous ;). Take, for example, these very dirty, but oh-so-comfortable, black leather boots. Combat style, and made in Canada! Hey Canada :). These were in desperate need of a good cleaning, but for $2 I knew that I'd be up for the challenge. 


I grabbed my supplies first:

  • dirty boots
  • saddle soap
  • soft cloth/towel
First, it's a good idea to brush off any bits of dirt or dust that'll come off easily. Then, remove your laces. {I did a quick rub on the front of my boot before removing my laces just to give you an idea of how dirty these really were.} Next, dampen your cloth and rub across the saddle soap to work up a bit of lather (not suds, but essentially you're working it into your cloth). Then have at it! Rub all over your leather boots/shoes making sure to reach all of the creases and cracks. Once you've given them a good rub, you can find a clean spot on your cloth and wipe away any excess soap while buffing your shoes for a bit of shine/luster.


Here's a look at mine after the cleaning...dirty rag and all! The leather came out so pretty and is super soft/pliable (I told you they were uber comfortable). Ready for wear!


And the obligatory side-by-side shot ;). Much better.


To disinfect them, I used a pretty basic method: mixing a bit of water with hydrogen peroxide and spraying the insides. I then let them air out and dry completely. Some people prefer to use a mixture of bleach and water (just be careful not to get this on the outside of the shoes), or Lysol disinfectant, or putting them in the freezer for 24 hours to kill the germs. Pick your poison...just make sure you do it! Now, as is true with this next pair of shoes, replacing/using insoles can also go a long way in removing any unwanted germs. The boots' insoles needed to replaced and thankfully I scored 3 sets at the thrift store brand new! Granted, they were brand new in the package circa 1995, but hey, they work like a charm ;). 

I found these Minnetonka moccasins at a community swap (free!) two days after almost buying a pair exactly like this (but new) at Urban Outfitters for $20. For reals. They were similarly in need of a new insole after going through the disinfecting process. But I also felt they could benefit from a little makeover as well. 


I'm not a big fan of fringe. First, I shortened the ties to get rid of the nasty dirty bits. Then I trimmed straight across the fringe to even it out. Hmmm, not sold.


So, then I gave them another trim with a rounded 'peter-pan collar' inspired look. I tried tying the ties a couple of different ways. Which do you prefer?


Now, those free mocs are soooo much better! And with the new insoles, they are even more comfy to wear. I have to say, I am not completely sold on this after look and may mess around with these a bit more...paint, maybe? We'll see :).


So, the next time you bring a pair of thrifted shoes home, you know how to disinfect and clean them up! This quick 'fix' takes only a few minutes and can really make a huge difference to your feet :).

Happy Refashioning!
Peace,
Andrea