Showing posts with label blouse. Show all posts

Tuesday, October 14, 2014

Cargo & Polka Dots

Today I've got a refashion, and an alteration. Let's get started with the refashion! I found this polka-dot blouse at my local thrift and picked it up for $2. First things first? Cut out the shoulder pads!

As I am a major 'wing it' kinda gal, I got down to it. I turned the blouse inside out, chopped off each sleeve, put it on, then pinned where the armholes would need to end. As you can see, I not only removed the sleeves but cut halfway down each side at an angle, and I needed to close the sides back up.

Now, as I was just 'winging it', I ran into a couple of small issues...I decided to finish off the arms with bias binding. My first time ever! Aaaand it went well until this happened (notice the shoulder). I redid it three times...yeah, and this was the last cause then I thought, "It's my first time finishing off this way and it should look like it was my first time." ;) I was basically done trying to fix it. To 'make' the bias binding, I simply cut a section of the cutoff sleeves that was long enough to finish off the armhole. Oh, and did you notice the bust dart? Yeah...didn't realize I needed one until I'd already done with the bias. So, I thought, "Screw it! I'm gonna add it after and not care...again, its my first time."

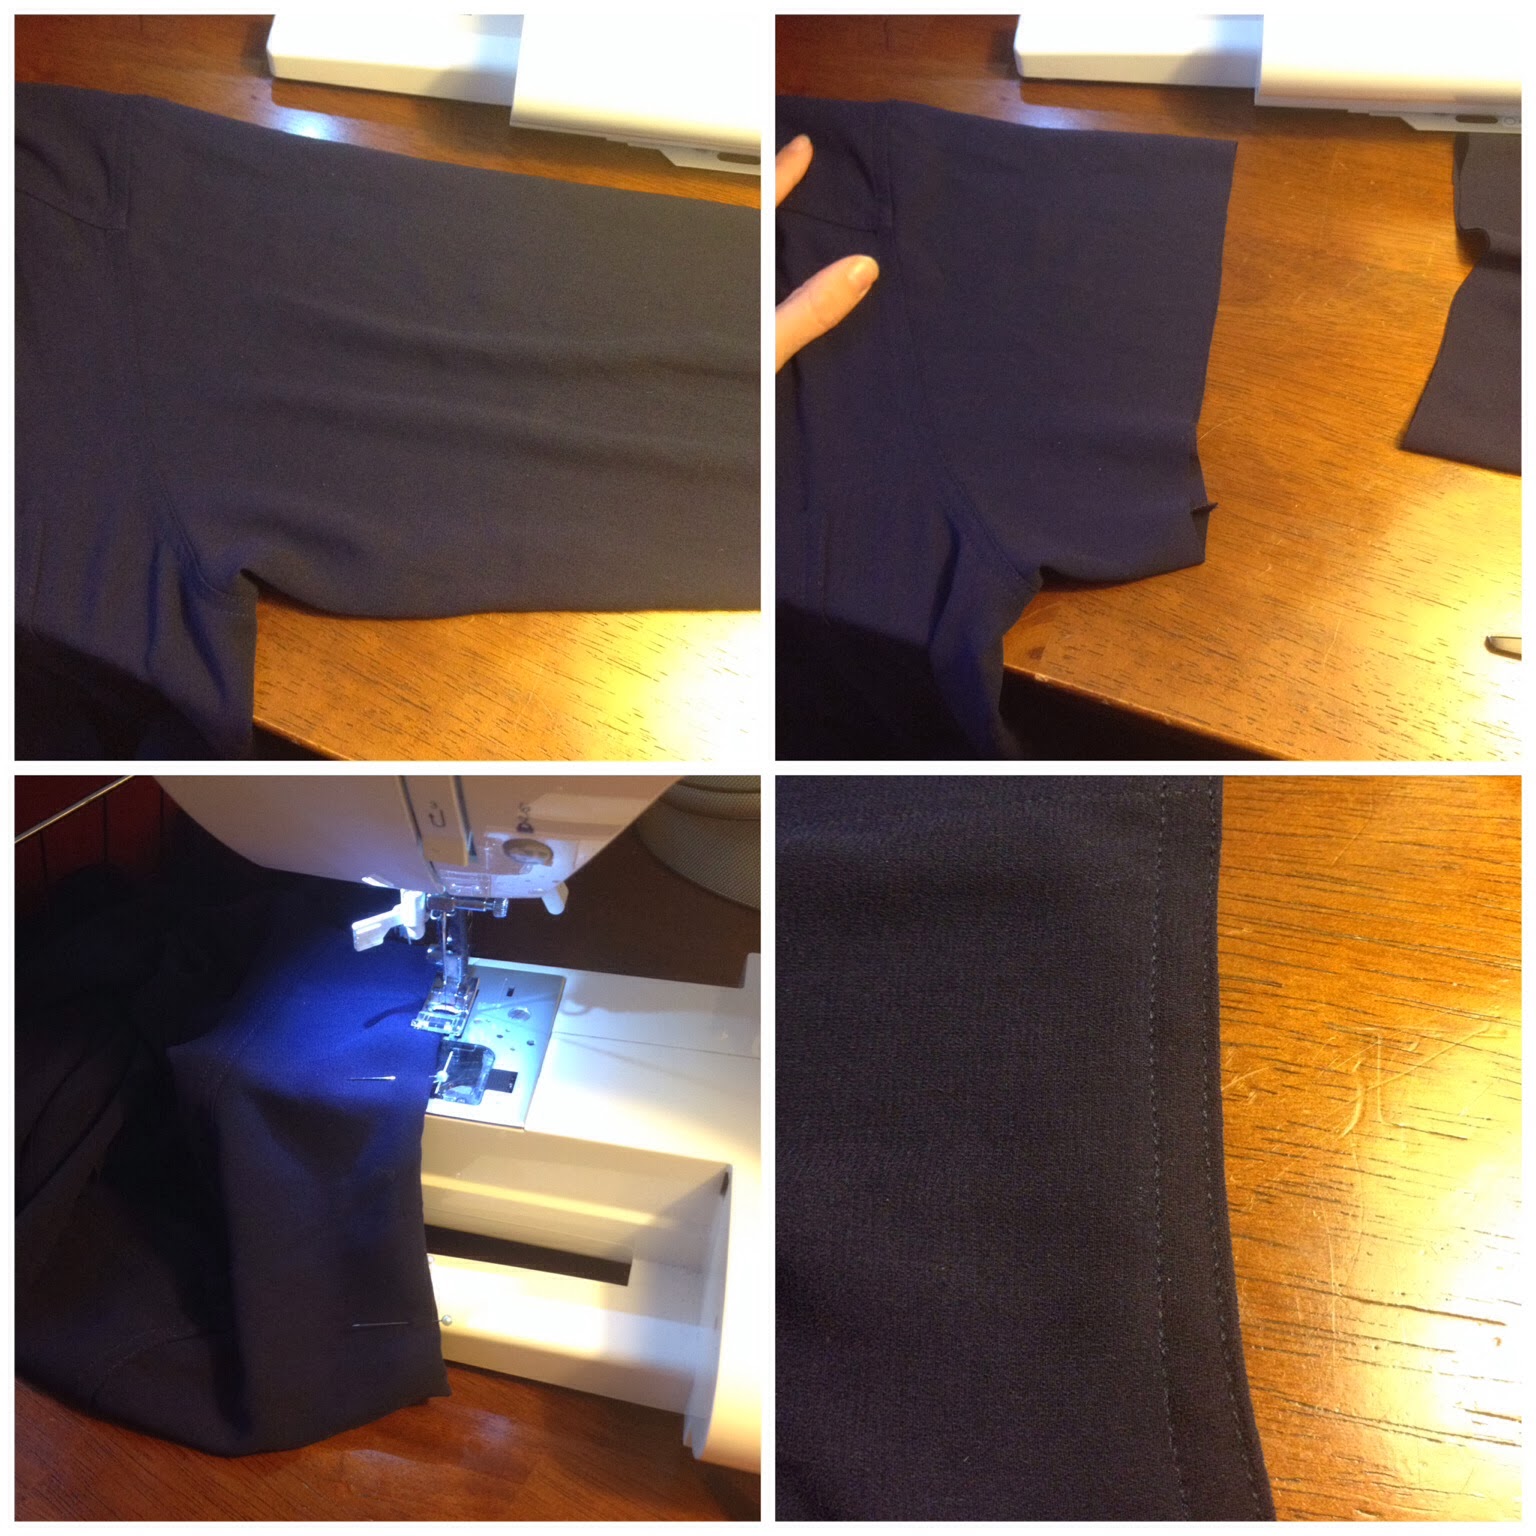
The alteration comes into play with this pair of pants I thrifted while in MI last month. They're a size 8, and I normally wear a 4 or 6, depending on the brand/cut/style/etc. I could have simply always worn them with a belt, but even for that they were a bit saggy. And without a belt, they created 'droopy crotch'...not. good. So, what method did I use for taking them in the required amount?

First, here's the after:

Starting just above the cargo pockets on each side, I took them in by about a half an inch (measuring from the waist in). I also ran them through my machine 3 times to get a super strong seam. Because I only took in a small amount on each side, I didn't trim the excess fabric. It doesn't create any extra bulk and isn't uncomfortable. And if I ever gain weight I can simply undo the process. ;) Not planning on that!


 I decided to wear the two pieces together, and added a faux black leather jacket I got for $30 at Uniqlo last year, a yard sale statement necklace ($2), and my thrifted cognac leather booties ($6). I'd prefer this with black booties...but I haven't had any luck in finding them at the thrift store and I seldom find myself at any type of shoe store. They're on my thrifting wish list :).

I feel like I might like this top better under a jacket or cardigan as long as I'm wearing a belt...seems boxy. But that could just be me. Here's the before and after of the top:

 Happy Refashioning!

Peace,
Andrea


Thursday, May 8, 2014

#MMMay14: Day 8

Another quick one today folks, as I want to spend some time sewing and creating...and reading ;). I threw on one of my favorite refashions. Something I like to refer to as my Green Granny Silk Blouse. Here's the story on how I refashioned it (super simple changes), and here's the shot of me in it today!


All I did was throw on some thrifted skinny jeans with this top and I've got a cozy, non-pajama outfit for a day spent at home. The good thing about rainy days is that I get to throw on my pretty floral rain boots whenever I need to head outside ;)


And they make me smile :). Until tomorrow...

Peace,
Andrea

Wednesday, May 7, 2014

#MMMay14: Day 7

Just a quick post today as I'm trying to catch up on a mountain of cleaning and errands. I struggled a little bit with what to wear today because I just wanted to stay in my pajamas all day. I've been exhausted this week! So, I came up with something that is as comfy as wearing pjs.
Think I should pick up my pattern pieces yet and put them away? ;)

I refashioned this silk top two years ago...it was a thrift store XXL dark green long sleeved top. It's a bit sheer, which I don't mind. I was even able to dig up a before shot, though I apologize in advance for the poor quality.

Essentially, all I did was rip off the sleeves, finish off the edges and take in the sides a bit. I left it with a flowy fit as I like to tuck, blouse, etc.

I paired it with a long black maxi skirt and some thrifted jewelry. Easy peasy :).  Hopefully, tomorrow I'll be feeling a bit more inspired and energetic...though the forecast calls for rain. Meh. Here's to getting all of my cleaning/errands done today so that I can sew all day tomorrow!

Peace,
Andrea

Sunday, May 4, 2014

#MMMay14: Day 3

Shoulda had this posted yesterday...asked my son to take pics of my husband and I and they all came out really bad! (Normally he does a great job). It was evening, and the lighting in the outdoor eating space at the restaurant wasn't great. Soooo, I put my outfit back on this morning to take pics by the light of day ;).

We spent most of the day at my son's preschool helping with the annual garden clean-up and celebrating the 10 year anniversary of said garden. It was tons of work, fun and they had great music besides! The local middle school jazz band played and were very talented, then a local band played that specifically do gigs geared towards kids and were so much fun (and awesome to boot!). Needless to say, we came away well-fed, worn out, and having had a great time :). Oh, and dirty. My son then saw balloon animals floating around and we remembered a street fair that was happening, so we went, ran into some friends, had mango lemonade and our son enjoyed a balloon superhero and the free bouncy house. After a couple of hours back home to rest, relax and freshen up, we decided to head out for dinner. (Busiest day ever as we tend to spend so much time at home and haven't hit the hectic schedules that being involved in extracurricular activities produce!)

Here's what I wore:


The cropped jacket is a consignment store find. My top was thrifted and refashioned, while my jeans were bought new 5 years ago and 'skinnified' two years ago. My gold flats were bought new. My bracelets and earrings were thrifted, as well.

This top is something I have repeated often when refashioning thrifted blouses. I decide whether the sleeves and collar are staying or going (in this case, going and staying, in that order), then I take the blouse in from the armpits down to the hem gradually tapering out to give it an a-line shape. This is a very flattering fit for me and makes it easy to grab any of the blouses I've refashioned without worrying too much about how it'll look on any particular day. The jeans, again, are a repeat of a process I've performed over and over again on jeans and pants. Try them on inside out, pin or mark how much needs to be taken in and after running them through my sewing machine, I cut off the excess and finish off the raw edges. You could call this outfit a uniform, of sorts, as I wear a variation of it at least 3-4 times a week. It's easy and casual for daytime, and its a snap to dress this up for a family dinner or even a date night (with heels and bolder jewelry).

Hoping to jump into some of my dresses and skirts soon, but its been windy around here and I don't like the opportunity for mishaps ;). Stay tuned a little later on today to see what outfit I've put together for a relaxed Sunday...

More me-made pieces are on their way!
Peace,
Andrea

Friday, May 2, 2014

#MMMay14: Day 2

Today was all about laundry, dishes, and cleaning....at least the first half. But I tackled all of it this morning so that my son and I could go out and enjoy the afternoon. Here's a snap he took of the me-made outfit I am wearing today.

My first refashion of 2014, this Anthro-inspired top, paired with 'skinnified' gray pants (super comfy) and some coral colored flats from UO. The top and pants were thrifted. I accessorized with my son's backpack and water bottle... ;). Why didn't I actually accessorize? I think I've gotten out of the habit as I don't wear much jewelry during the winter. Time to break out the collection and start playing with some pieces to go with my me-made outfits!

Hope I get to do some sewing this weekend, and then share some new creations with you!

Peace,
Andrea

Thursday, April 3, 2014

Thrifted OOTD: Going Green

I've been down with a stomach bug since my shoe refashion and am on the mend today, breathing fresh air and eating lots of chicken soup and crackers :). Perfect day for an outfit post, since I just don't have the energy for a new refashion.

The secondary brick on our building is gorgeous, I think. And it provides a great backdrop for photos! You'll see the front of the building in a later pic and its just not as appealing as the sides and back where all of these lovely rusty brown shades come together. Without further ado, here is my outfit of the day...


Awkward pic of me trying to get a shot of my braid & bun (good thing I cleaned my ears!)...love doing my hair
like this and there are lots of variations to try!


I went with a thrifted pair of Gap jeans that fit like a boyfriend jean, I guess, and have patches that I sewed in using gray thread and straight stitching back and forth in a random crisscross pattern. They aren't very visible at any distance, so I may use different blue shades to make them stand out a bit more. Why not make a repair a feature? I paid $5 max. My top is a refashion from a couple of months back: the green granny silk. Not sure what I paid for the original blouse, though my local thrift normally marks silk tops at $4 or $5...just depends on if I grabbed it during a half-off sale. My earrings are actually a gift from my sister in law and are sterling silver with a smooth mint/aqua stone and I love them...they are just my style. The shoes are also thrifted! duh ;) and cost me $4. I found them at a thrift store in MI when I was home visiting a couple of years ago (love thrifting with my sis whenever I get a chance to go home!).

There you have it! This is what I wore today out to the store to buy my chicken soup and crackers, then later to the library with my son once I'd regained a bit of strength, and as I write this cuddled up on the couch eating my toast with almond butter. Easy, comfy, and still pretty darn stylish!

Peace,
Andrea

Tuesday, February 4, 2014

The Giveaway Top

I had a giveaway over on my FB page last week when I reached 200 likes. If you didn't get to enter, don't worry, I'll have more to come! The lucky winner, Carey, chose to have me refashion a thrift find for her...she is a teacher and needed whatever I made to be appropriate for the classroom, easily paired with many things and layered under sweaters/cardis. Among other colors, she indicated that she liked pinks and on my foray to find the perfect piece I came across this beauty:
Love those buttons!

At half price I only paid $2.50 and it is a size 12. It was so similar to the green granny silk blouse that I recently refashioned and I envisioned a very similar outcome for this one, as well.

I started out by removing the shoulder pads, seam ripping the sleeves and cutting down the length by a couple of inches or so:
Can you tell I had a hard time capturing the color just right? Four different shades, all one top ;) (I've definitely got more learning to do...next lesson will be how to capture colors and darks)
Moving on...I then took the collar off with my seam ripper:

I didn't like the neckline as it was sans collar so I decided to give it a different shape. I slimmed down the sleeves and cut out my new neckline. After cutting off the extra, I overlocked the edges and to finish off the collar I simply folded over the finished edge and topstitched a tiny hem:

Upon reattaching the sleeves I also took the sides of the top in from the armpit and curved out to the hip leaving it loose but giving it shape. Again, cut off the excess and finished off all raw edges. And here's how it came out! 

I like the opened up neckline, the pin tucks are beautiful and the color really pops! It is simple and can be worn with jeans and flats, or dressed up for school with trousers, skirts, etc. Carey is a similar size to me (actually thinner) so it should fit her just fine :), which is why I am modeling the final product for you all to get an idea of how it looks.

She's already seen it, approved it heartily, and it is on its way to her in the mail! Hope you love this piece and are inspired to transform your own pieces to work better for you!

Here's one last look at the before and after:

Peace,
Andrea

Friday, January 24, 2014

Green Granny Silk

Oh yeah! It's another granny silk top that I found at my local thrift store several months back that makes a complete 180 and may now be my favorite top. I know!!! I just love it :)

Ok, here's where I started. Cue the boxy "old lady" silk top in a lovely green (my favorite color):
When I use the phrase "old lady" I'm only referring to a style, not an age group :-)
It's really quite bad...my son even described its very large sleeves as bat wings (who knew he had so much fashion sense?). It's a size 14 (I believe) and in perfect shape...errr, well, condition, aside from the fact that it needs a good pressing. What does need to change is the shape; too boxy, too big, but it has potential.

First things first, I seam picked those sleeves off and then resized them, trimming off the excess fabric and finishing off all of the raw edges with an overlocking stitch:

Next step was to reattach the sleeves, and upon sewing them into place, determine how much of the body of the shirt would come in as well. I basically gave it an A-line shape by taking it in from the sleeve armpit tapering out as I sewed towards the hem (again, cutting off excess and finishing all raw edges):

Last step was to change up the cuffs! I wanted them to be slimmer, and the double button closure allowed for me to remove a strip from the cuffs to make into sleeve straps:

Now, the plan was to attach the straps to the inside of each sleeve so that I could then roll up my sleeves and they would simply button on the outside holding them up, but in the end I decided I didn't want to do that to this top and am saving the straps for something else :)

Here's how the reshaping turned out! (Oh, and I did iron this one, which makes such a difference):

I absolutely love the new slimmer sleeves that just skim my wrists and the slight A-line changed the boxy shape into a flattering blouse! Bound to be one of my go-to tops for the spring <3

I decided to try out some styling to see how I might be wearing this top and came up with three different looks (though that is merely a fraction of the possibilities!):

Looks #1 and #3 are my favorite and how I'll wear this on an average day. I HAD to include the second look simply because my face makes me giggle ;). I definitely don't have many (read ANY) opportunities to rock look #2, but you never know...the husband and I could totally miraculously gain a night life and start going out dancing and such, right?! Well, here's hoping...

And one last look at the before and after:
Love it!
Hope this inspires you to take a second look at those granny tops when you're out thrifting! I'm addicted to a good granny refashion :)

Peace,
Andrea

Wednesday, January 15, 2014

Baring some skin...

Now, I've never been super confident about how I look in a bathing suit...even before having a child, I had my "issues". Stupid? Yes. Fact of life? Unfortunately, yes. Can this change? YES! 

Every year as the new year would roll around I'd make the resolution to be bathing suit ready by summer.... This never happened, because I wanted to look a certain way that honestly, I will never achieve unless I, 1. have lots of extra money to blow on ridiculous things, and 2. choose to blow said money on surgeries and procedures that would make me look "a certain way". Not gonna happen. So, how about a change in mindset instead? This is something that I struggle with, but I'd like to share my journey to being "bathing suit ready" as I not only explore changing my mindset, but also creating a mini wardrobe that helps me feel confident in my skin when at the beach or pool. As.I.Am. Now, I have set small goals for myself in the way of physical fitness, but they are not reached only by what I see but also in how I feel. Nothing wrong with wanting to be physically fit and healthy, but I've gotten rid of the ridiculous standard that is more harm than help. Diet will play a role as well. When I use the word diet, I don't mean trying out some fad diet to lose weight, because I don't need to lose weight (lucky me). What I'm referring to is cutting down on/out certain things that bring down my energy level and keep me from feeling my best. Okay? Okay. 

So, as a first step in my journey, I am baring some skin...right here. right now. Here we go!

I started with this lovely yard sale shirt/jacket thing:
Shoulder pads big enough for a linebacker? Check!

First things first, get rid of the shoulder pads!!! (They'll be added to my collection for later usage) Also, get rid of the discolored tag...then start seam ripping those sleeves off!

Next, cut the sleeves at about a 3/4 length, cut the cuffs from the ends of the sleeves, and slice open the cutoff portion. Now, seam rip up the main portion of the sleeve and pin the extra fabric in place to create a sleeve that is the same diameter from shoulder to hem.

Here, the sleeve is now about the same diameter from shoulder (the angled end) to the hem. I simply zigzagged the edges of the fabric so it wouldn't fray and left them. I like the "unfinished" look, though, if you prefer a more professional look, choose a different overlocking stitch, or simply fold under twice, pin, and sew the sleeve hem in place. Last, attach the sleeve cuffs at the waist on either side of the blouse so that a button and buttonhole end meet in the middle (this becomes your "sash" or robe closure!)
There were only two tiny scraps cut off of this entire project that I didn't use, and they'll just be added to the scrap bag. 
Because of the high side and back slits, when I wear it as a top I'll wear some sort of cami underneath...or I could close them up a bit.
Open or closed, I simply folded the collar and button plackets under and they stay...I may add a few stitches to ensure they stay that way when at the beach in the wind.

And one last look at the before and afters!

I like that this is now a versatile piece that can transition from my everyday wardrobe to a beach/pool friendly piece. I like how I feel in it...I feel more confident and sexy while maintaining a bit of comfort by being partially covered up. I hope to get to the point where taking it off doesn't cause me to start darting glances around wondering who is noticing the "imperfections", but for now, that is yet to come :).

What do you all think? I'd love to hear from you!

Peace,
Andrea

Sunday, January 5, 2014

My first refashion of 2014...a copycat!

I hope you enjoyed your holiday season, and have started this new year with a fresh and positive perspective. Attitude can be the key to more: more happiness, more experiences, more successes and failures, more pure enjoyment of life! Now, I'm not normally such a chipper, positive person. Far from it, some days, but I like to take advantage of each new beginning (whether its a new year, another birthday, etc) to get myself straightened out a bit ;)

Enough of the pep talk, and down to business. I burned myself out a bit doing an "all homemade and thrifted" Christmas for my family. Don't get me wrong, I loved doing it and I'm glad that I did. Lack of funds truly helped breed creativity! But, once I'd finished everything up, I didn't want to have anything to do with my sewing machine or notions. So, I took a couple of weeks off. As I was browsing through my "refashion ideas" board on Pinterest, I came across a copycat that I wanted to make of the Beckett Buttondown (no longer available) from Anthropologie. I had the perfect navy blue thrifted top sitting in my stash, so I figured, what the heck. Let's see if I've got my mojo back...here's how it went down.

I started with this thrifted polyester number in navy blue:


To start, I chopped off the sleeves and hemmed them with two lines of topstitching:


Next step, I carefully cut along the edge of the cuffs (from the chopped off sleeves) and zigzagged along the cut edge to prevent any potential fraying in the wash. Then, I pinned them onto each shoulder (to verify placement) and then attached by sewing down the end on the inside, then using the button from the cuff (removed and then sewn onto the shoulder) to button it onto the top of the shoulder on the outside:


I also decided to give it the same kind of high-low effect by shortening the front of the top. I did this by simply chopping off 3 inches and rehemming the bottom edge:


At this point I thought I was done. But I woke up this morning and decided to change the shape of the back (low) hem by rounding it. I also took in each side, from the sleeve down, by about 2 inches and tapering out to create a slight A-line. This helped slim out the top a bit which I prefer being a smaller busted woman. Here's the final piece:


I love how it came out, and this is how I would style it on a warm spring day with flats or sandals. It'd go great with a striped maxi skirt, or even a pair of cutoffs once summer rolls around. And because I cut off my head in all of the above shots, I'll share my tired looking self as I finished this up this morning :)


Have an awesome day!
Peace,
Andrea